4. Publisher & Subscriber Python
Writing your first ROS 2 publisher and subscriber in Python with rclpy
Summary
Estimated time to completion: 1'5 hours
Simulated robot: Turtlebot 3 Burger
What will you learn with this unit?
- What are ROS 2 topics and how to manage them
- What are topic messages and how they work
- What is a publisher/subscriber and how to create one
- Debugging tools
What are ROS 2 Topics: Publisher & Subscriber?
Topic Publisher
We will continue to use the first_pkg package that we created in the previous unit.
Create a new Python file in the first_pkg folder of the package (ament_python expects Python modules in the folder with the same name as the package) called points_publisher.py.
cd ~/ros2_ws/src/first_pkg/first_pkg && touch points_publisher.pyIn ROS 2 Python nodes are installed as console scripts via setup.py, so they do not need the executable bit set and they do not need a shebang — we will register them properly in a moment.
Paste the following code into points_publisher.py:
import rclpy                          # The ROS 2 Python client library
from rclpy.node import Node           # Base class for every node
from std_msgs.msg import String       # The String message from std_msgs


class PointsPublisher(Node):
    def __init__(self):
        super().__init__('points_publisher')
        # Publisher on /points with QoS depth 1 (keep latest only)
        self.pub = self.create_publisher(String, '/points', 1)
        self.counter = 0
        self.house = 'Gryffindor'
        # Timer firing every 0.5 s → publish rate of 2 Hz
        self.timer = self.create_timer(0.5, self.on_tick)

    def on_tick(self):
        msg = String()
        msg.data = f'{self.counter} points for {self.house}!'
        self.pub.publish(msg)
        self.counter += 1


def main(args=None):
    rclpy.init(args=args)
    node = PointsPublisher()
    try:
        rclpy.spin(node)
    except KeyboardInterrupt:
        pass
    finally:
        node.destroy_node()
        rclpy.shutdown()


if __name__ == '__main__':
    main()
So, in essence, this code creates a node and publishes a sequence of String messages on the /points topic at 2 Hz.
To summarize: A publisher is a node that publishes a (number of) message(s) on a topic.
So now... what is a topic?
A topic is a channel that acts as a pipe (connection) for all ROS 2 nodes to either publish or subscribe information (msgs) from. Now let's look at some commands that relate to topics (some of which you've already used).
Register the entry point
Open ~/ros2_ws/src/first_pkg/setup.py and add the new node to console_scripts:
entry_points={
    'console_scripts': [
        'first_node = first_pkg.first_node:main',
        'points_publisher = first_pkg.points_publisher:main',
    ],
},
Build the Code
Go to the ros2_ws:
cd ~/ros2_wsBuild the package:
colcon build --packages-select first_pkg --symlink-installSource the workspace:
source install/setup.bashCheck if the package is in the workspace:
ros2 pkg list | grep first_pkgRunning the Publisher
In ROS 2 you do not need a roscore. Just run the node directly in a terminal:
ros2 run first_pkg points_publisherNothing happening? Well... that's not actually true! We just created a topic named /points, and published through it a string that increases indefinitely. Let's check this out.
A topic is like a pipe. Nodes use topics to publish information for other nodes so that they can communicate. You can find out, at any time, the number of topics in the system by doing a ros2 topic list. You can also check for a specific topic.
Open another terminal ([ctrl + b] and [Shift + 2]), source the workspace, and type:
ros2 topic listNow check for a topic named /points.
To request information about a topic type the following command in a terminal:
ros2 topic info /pointsThe output will look something like this:
Type: std_msgs/msg/String
Publisher count: 1
Subscription count: 0
The output indicates the type of the message (std_msgs/msg/String), how many publishers are on this topic, and how many subscribers. Use the -v flag for more detail (QoS, node names).
Now, type in a terminal:
ros2 topic echo /pointsCheck the output of the topic in real-time. The output will look something like this:
data: "130 points for Gryffindor!"
---
data: "131 points for Gryffindor!"
---
data: "132 points for Gryffindor!"
You've learned that a topic is a channel where nodes can either write or read information. You've also seen that you can publish (write) data onto a topic using a publisher.
Subscriber
So we just learned about publishers which publish data (messages) onto a topic. Now you might be thinking that if it is possible to write data on a topic we must also be able to read data from a topic ... and you are absolutely right.
To do that we must create a subscriber on a topic.
Create a new Python file in the first_pkg folder of our package and name it points_subscriber.py.
cd ~/ros2_ws/src/first_pkg/first_pkg && touch points_subscriber.pyPaste the following code into points_subscriber.py file:
import rclpy
from rclpy.node import Node
from std_msgs.msg import String


class PointsSubscriber(Node):
    def __init__(self):
        super().__init__('points_subscriber')
        # Subscribe to /points with QoS depth 10 and our callback
        self.sub = self.create_subscription(String, '/points', self.callback, 10)

    def callback(self, msg):
        # ROS 2 logging goes through self.get_logger()
        self.get_logger().info(f'"{msg.data}" Dumbledore shouted')


def main(args=None):
    rclpy.init(args=args)
    node = PointsSubscriber()
    try:
        rclpy.spin(node)
    except KeyboardInterrupt:
        pass
    finally:
        node.destroy_node()
        rclpy.shutdown()


if __name__ == '__main__':
    main()
Register it in setup.py too:
entry_points={
    'console_scripts': [
        'first_node = first_pkg.first_node:main',
        'points_publisher = first_pkg.points_publisher:main',
        'points_subscriber = first_pkg.points_subscriber:main',
    ],
},
Rebuild:
cd ~/ros2_ws && colcon build --packages-select first_pkg --symlink-install && source install/setup.bashExecute the Subscriber:
In a new terminal ([ctrl + b] and [Shift + 5]) type:
ros2 run first_pkg points_publisherIn another new terminal ([ctrl + b] and [Shift + 2]) type:
ros2 run first_pkg points_subscriberThe output of the terminal where you started the subscriber should look something like this:
[INFO] [points_subscriber]: "1 points for Gryffindor!" Dumbledore shouted
[INFO] [points_subscriber]: "2 points for Gryffindor!" Dumbledore shouted
[INFO] [points_subscriber]: "3 points for Gryffindor!" Dumbledore shouted
[INFO] [points_subscriber]: "4 points for Gryffindor!" Dumbledore shouted
[INFO] [points_subscriber]: "5 points for Gryffindor!" Dumbledore shouted
[INFO] [points_subscriber]: "6 points for Gryffindor!" Dumbledore shouted
Now let's explain what just happened. You basically created a subscriber node that listens for the /points topic, and every time it receives a message, it calls a function (callback) that logs a string to the screen. Initially, nothing happened because no node was publishing on the /points topic, but when you executed ros2 run first_pkg points_publisher, data (messages) were published to the /points topic. It all makes sense now, doesn't it? Remember that another way to read the data on a topic is: ros2 topic echo /topic
Messages in ROS 2
As you may have noticed, topics process information via messages. There are many types of messages.
In the case of the code you ran earlier, the message type was std_msgs/msg/String, but ROS 2 provides many other messages. You can even create your own messages, but it is recommended to use ROS 2 default messages if possible.
Messages are defined in .msg files located in the msg directory of a package.
- To receive information about the structure of a message you can use:
ros2 interface show [message_type]- Let's have a look at the message type used earlier (
std_msgs/msg/String):
ros2 interface show std_msgs/msg/StringThe output will look something like this:
string data- In this case, the
Stringmessage has only one field nameddataof typestring. ThisStringmessage is from thestd_msgspackage.ros2 interface listandros2 interface proto <type>give you the full picture whenever you're unsure.
Exercise [30 min]
- Create a launch file
move_turtlebot.launch.pythat starts theturtlebot3_world.launch.pyof theturtlebot3_gazebopackage. - Create a publisher file called
move_turtlebot.pythat moves the simulated robot in a circle. - Add
move_turtlebot.pyto themove_turtlebot.launch.pylaunch file.
Hints:
- The
/cmd_veltopic is the topic used to move the robot. Runros2 topic info /cmd_velto get information about this topic and identify the message type used. - To fill in the
Twistmessage, you need to create an instance of the message. In Python, it goes like this:var = Twist(). - To know the structure of the
Twistmessage, you need to use theros2 interface showcommand with the message type used by the/cmd_veltopic. - In our case the robot uses a differential drive plugin to move. This means that the robot can only move linearly along the x axis or rotationally along the angular z axis. This means that the only values you need to enter in the twist message are the linear x and the angular z variables.
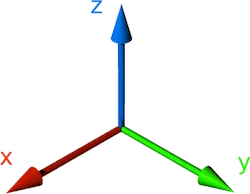
Twist message values are in m/s, so it is recommended to use values between 0 and 1. For example, 0.5 m/s.
Exercise Solution
Debugging
Estimated time to completion: 1'5 hours
Simulated robot: Turtlebot 3 Burger
What will you learn with this unit?
- How
ros2 doctorcan help you diagnose common problems - Add Debugging ROS 2 logs to your executables
- Filter ROS 2 logs
- Visualize connections between different nodes of your system
- Basic use of RViz2 debugging tool
One of the most difficult but important aspects of robotics is: knowing how to translate your ideas and knowledge into real-world projects.
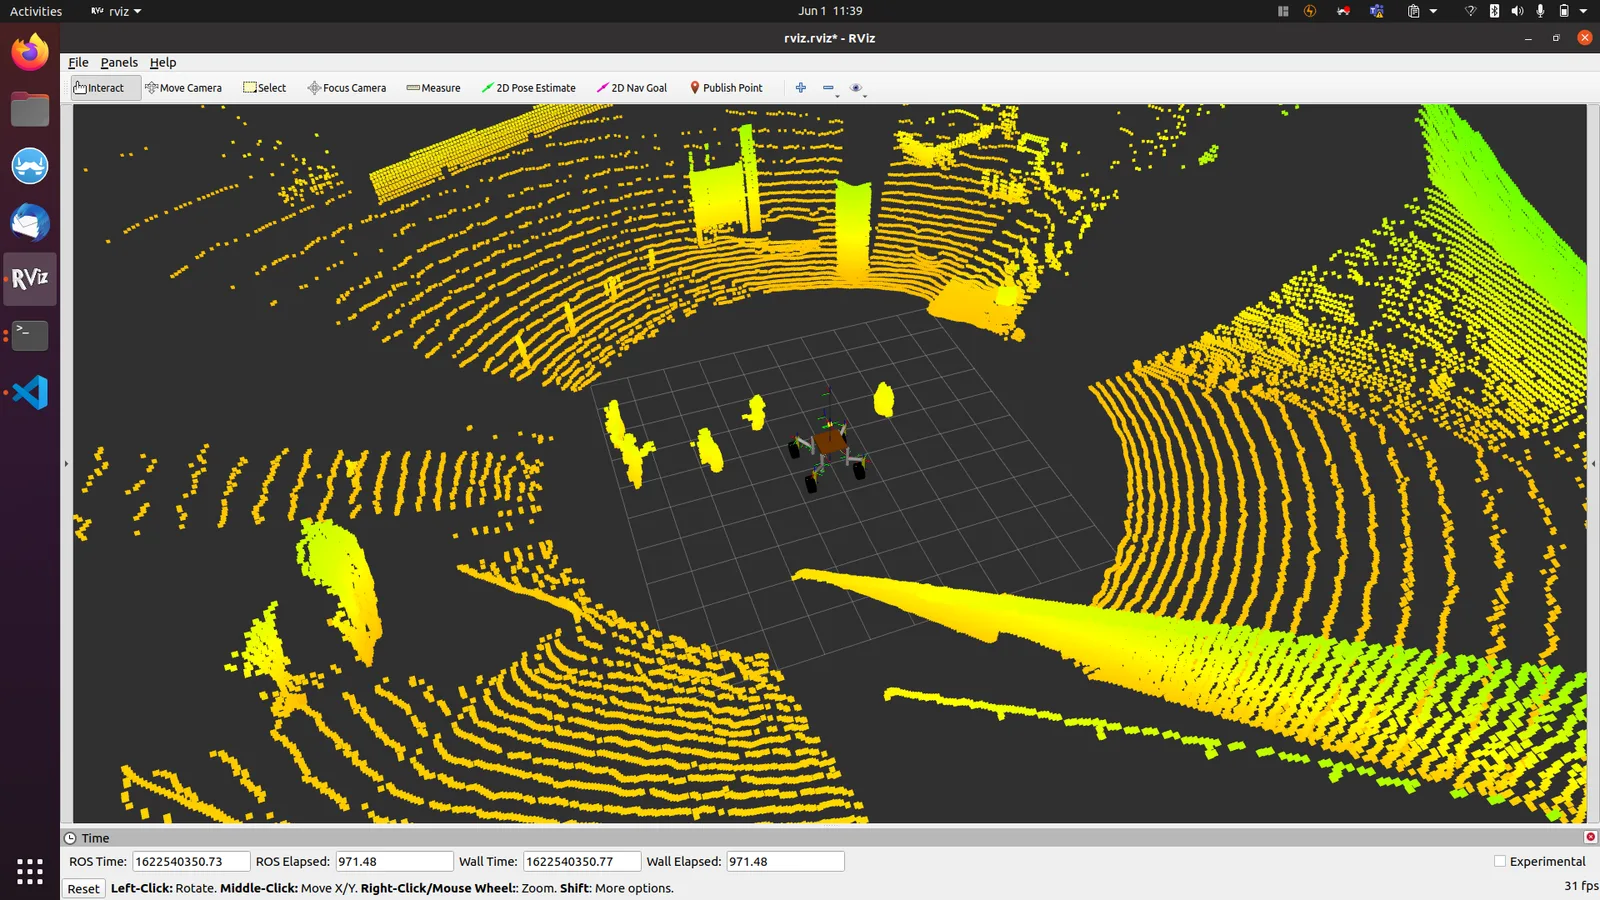
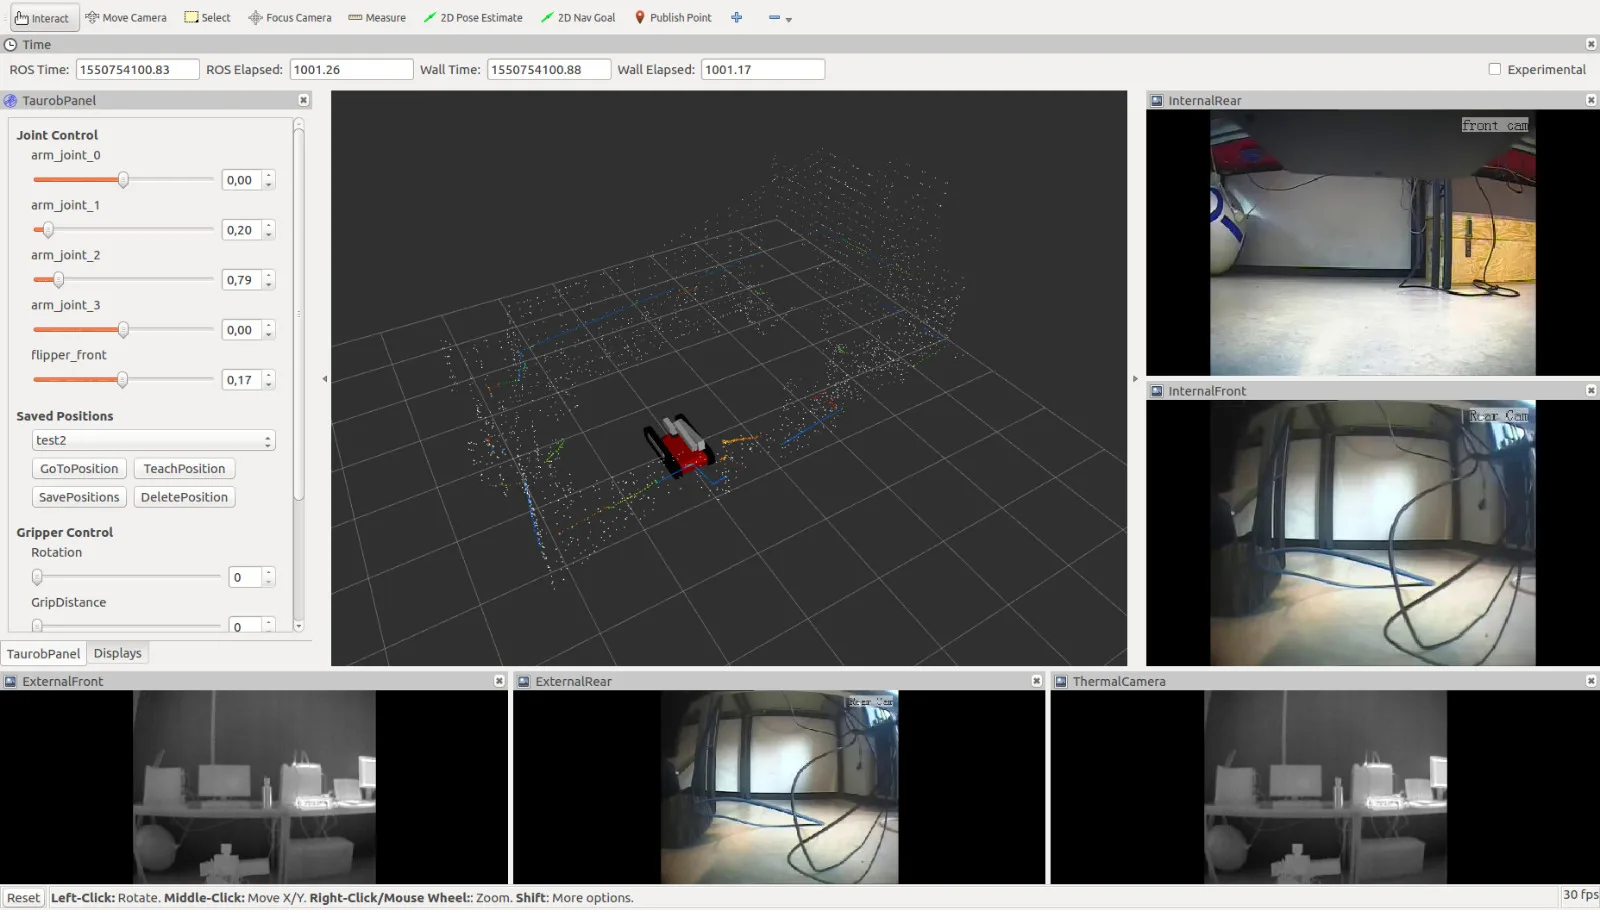
Usually in robotics projects: nothing works like in theory. Reality is much more complex and therefore you need tools to figure out what is going on and where the problem is. For this reason, debugging and visualization tools are essential and already implemented in ROS 2, especially when working with complex data formats like images, laser scans, point clouds or kinematic data.
Examples are shown in the following figure:
ROS 2 Debugging Messages and RQT-Console
We have used Python's print() and the ROS 2 logger self.get_logger().info() so far throughout this course without discussing the benefits/downsides.
print(): Follows the Dark Lord into battle. If you useprint, it is close to impossible to store the information you print to the ROS 2 framework.LOGS(): The logging system of ROS 2 allows us to print them on the screen but also to store them in the ROS 2 framework and on/rosout, so we can classify, sort, filter, or else on them later.
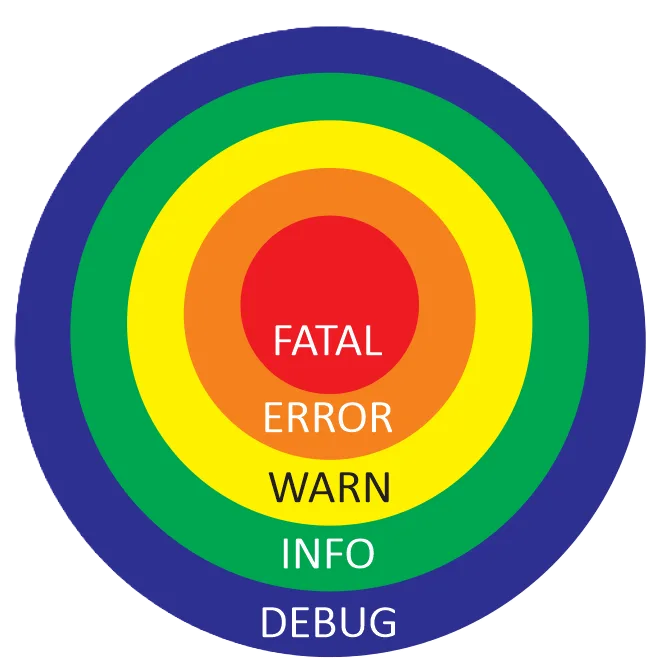
Every ROS 2 node has a logger accessible via self.get_logger():
DEBUG→self.get_logger().debug(msg)INFO→self.get_logger().info(msg)WARN→self.get_logger().warn(msg)ERROR→self.get_logger().error(msg)FATAL→self.get_logger().fatal(msg)
The ROS 2 logging system contains five levels. Each level includes the deeper levels. For example, if we use the Warn level for our node, all logs from Warn, Error, and Fatal will be printed.
Example
Let's test the different logger levels.
Create a new node called logger_test.py in the first_pkg source folder:
cd ~/ros2_ws/src/first_pkg/first_pkg && touch logger_test.pyPaste the following code:
import time
import rclpy
from rclpy.logging import LoggingSeverity
from rclpy.node import Node


class LoggerTest(Node):
    def __init__(self):
        super().__init__('logger_test')
        # Set this node's log level to DEBUG so every severity is printed
        rclpy.logging.set_logger_level('logger_test', LoggingSeverity.DEBUG)

        self.get_logger().info(f"The quidditch game is at {time.time()}")
        self.timer = self.create_timer(2.0, self.on_tick)  # 0.5 Hz

    def on_tick(self):
        self.get_logger().debug("You're A Wizard Harry.")
        self.get_logger().info(
            f"Doris Crockford, Mr Potter. I can't believe I'm meeting you at last {time.time()}.")
        self.get_logger().warn("I solemnly swear that I am up to no good.")
        self.get_logger().error("Dumbledore will only leave from Hogwarts when there are none loyal to him!")
        self.get_logger().fatal("Dobby didn't mean to kill anyone. Dobby only meant to maim or seriously injure")


def main(args=None):
    rclpy.init(args=args)
    node = LoggerTest()
    try:
        rclpy.spin(node)
    except KeyboardInterrupt:
        pass
    finally:
        node.destroy_node()
        rclpy.shutdown()


if __name__ == '__main__':
    main()
Register it in setup.py:
'logger_test = first_pkg.logger_test:main',Rebuild and source:
cd ~/ros2_ws && colcon build --packages-select first_pkg --symlink-install && source install/setup.bashMake a new Terminal with [ctrl + b] and [Shift + 5] and start the logger_test node:
ros2 run first_pkg logger_testThe output will look something like this:
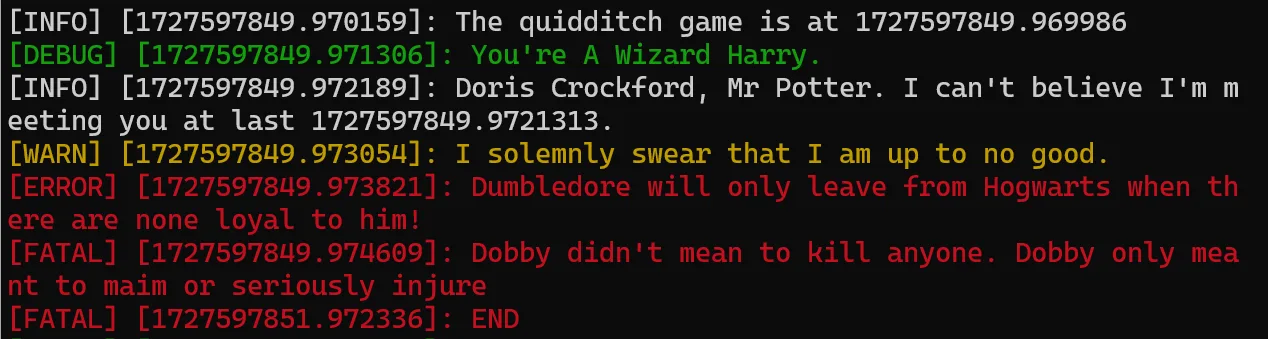
Exercise [5 min]
Adapt the log level of the logger_test node and inspect the output of the topic /rosout using ros2 topic echo.
In ROS 2 the log level is usually passed on the command line with --ros-args --log-level <level> — no need to bake it into the Python code. Try:
ros2 run first_pkg logger_test --ros-args --log-level logger_test:=warnOpen another Terminal with [ctrl + b] and [Shift + 2]. Inspect the topic /rosout:
ros2 topic echo /rosoutAs you have seen, the amount of data is already large. With only 6 running nodes, /rosout was already really hard to follow.
Now imagine ten nodes publishing image data, laser data, using actions, services or performing computations and publishing debug data from your Deep Learning node.
It is really hard to get the logging data you want.
This is where rqt_console comes in handy.
RQT Console
- Add
logger_testto yourmove_turtlebot.launch.pylaunch file (a newNode(...)entry) and launch:
ros2 launch first_pkg move_turtlebot.launch.py- Start
rqt_console:
ros2 run rqt_console rqt_console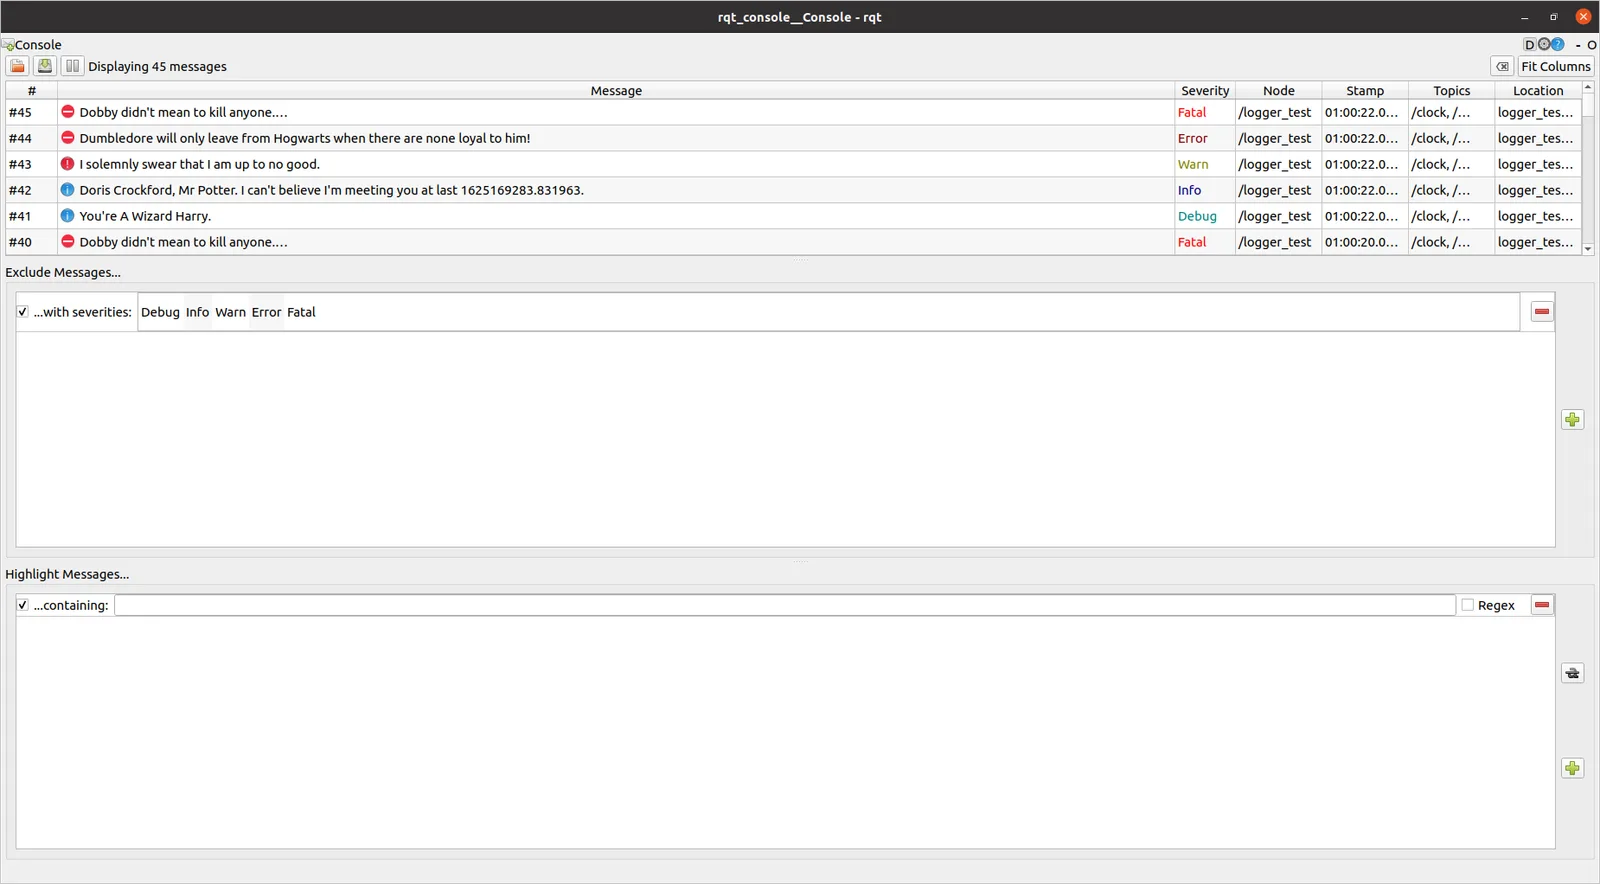
The rqt_console window is divided into three subpanels.
- The first panel outputs the logs. It contains data about the message, the severity/level, the node generating that message, and other data. This is where all your log data is extracted.
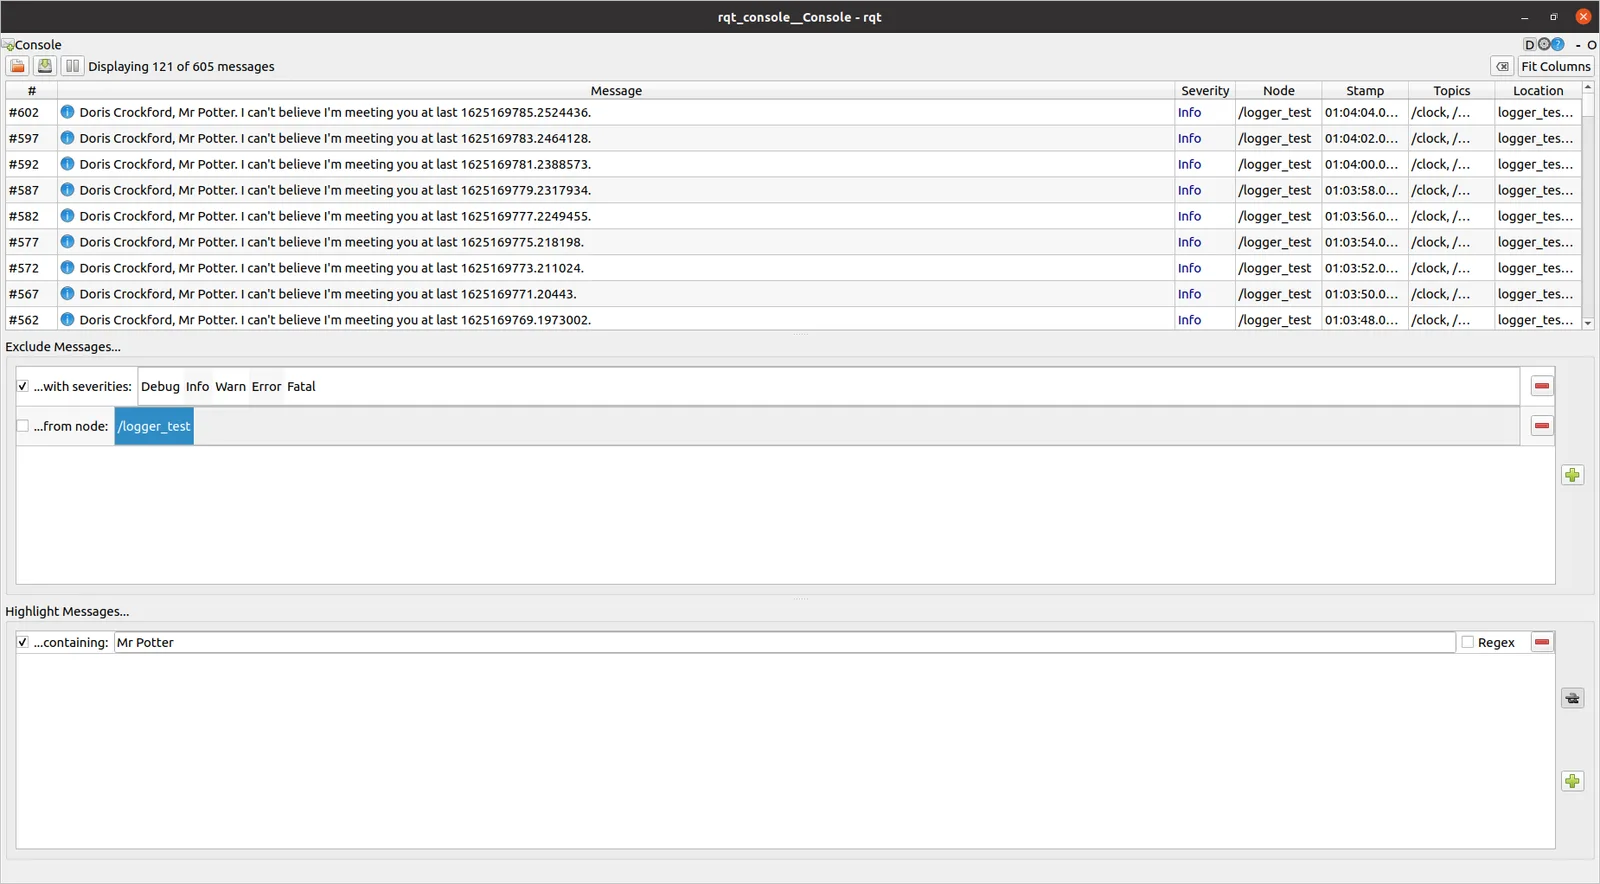
- The second one allows you to filter the messages output in the first window by excluding them according to criteria such as node, severity level, or that they contain a certain word. To add a filter, simply press the plus sign and select the one you want.
- In the third field, you can highlight certain messages while the others are displayed.
You also need to know that by clicking on the small white gear in the upper right corner, you can change the number of messages displayed. Try to keep it as low as possible to avoid performance degradation in your system. Further, using the small white gear it is also possible to set the log level of already running nodes (in ROS 2 this also works via the ros2 param set /<node> use_sim_time pattern and dedicated /<node>/set_logger_levels services).
RQT Plot
This is a very common need in any scientific discipline, but especially important in robotics. You need to know if your tilt is correct, your velocity is the right one, the torque values in an arm joint are above normal, or the laser has anomalous readings. For all these different msg types, you need a graphical tool that can quickly process all the data you receive in real time. This is where rqt_plot comes in handy.
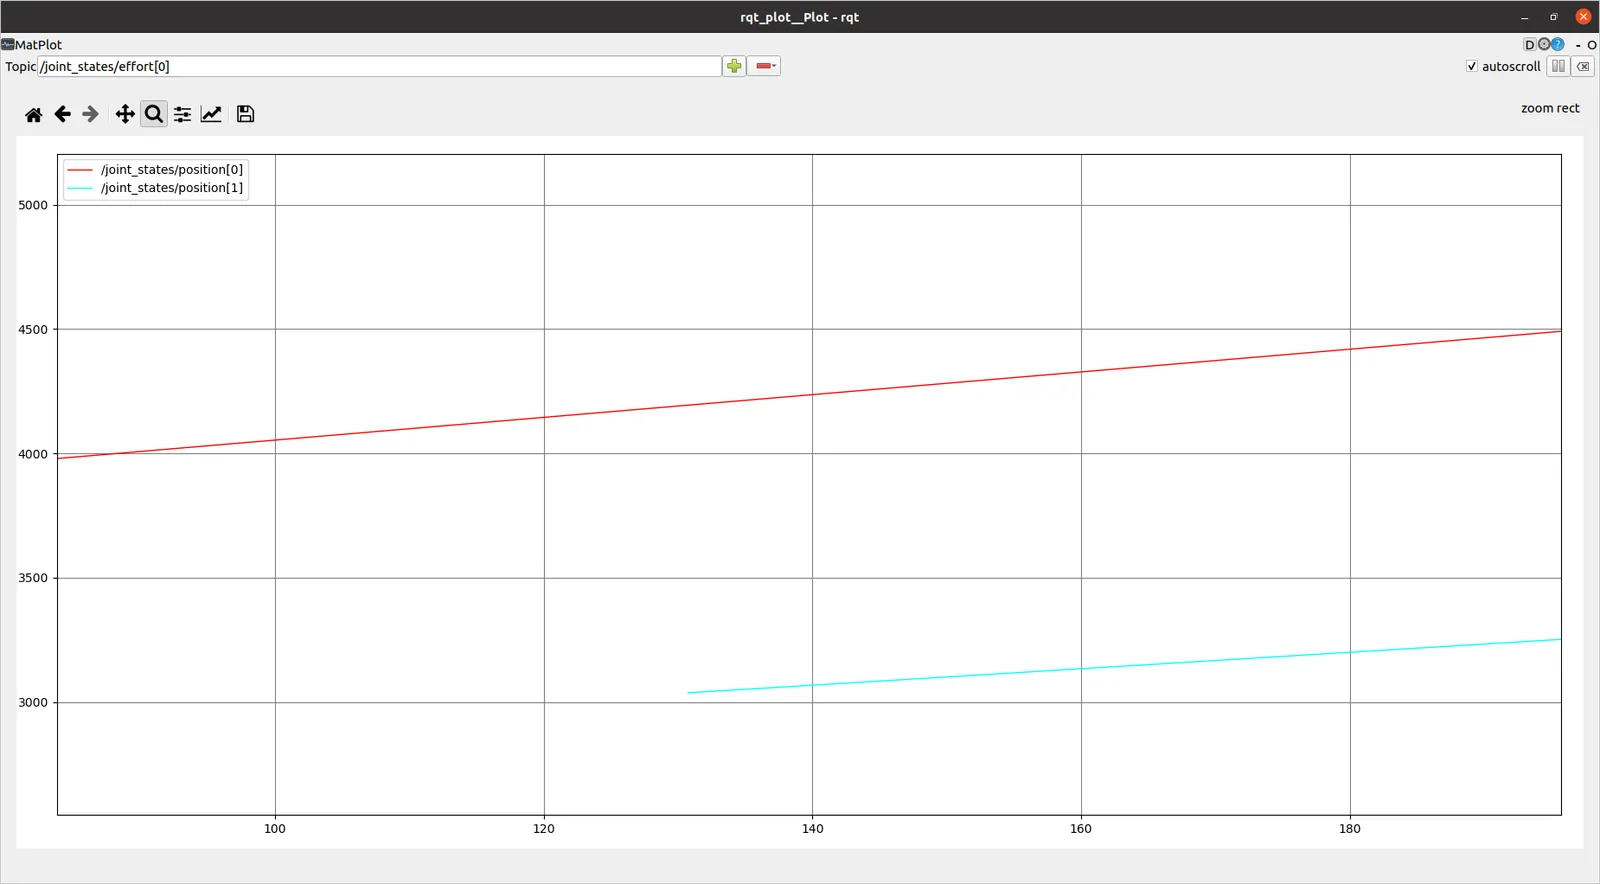
In the topic input located in the top-left corner of the window, you have to write the topic structure that leads to the data that you want to plot. Bear in mind that in order to be plotted, the topic has to publish a number. Once written, you press the PLUS SIGN to start plotting the Topic. In the case that we want to plot the robot joints, we need to plot the topic /joint_states, which has the following structure:
ros2 interface show sensor_msgs/msg/JointState std_msgs/Header header
builtin_interfaces/Time stamp
string frame_id
string[] name
float64[] position
float64[] velocity
float64[] effortStart it with:
ros2 run rqt_plot rqt_plotRQT Graph: Visualizing Node Connections
Is your node connected to the right topics? Why are you not receiving msgs from a topic?
These questions are quite common when developing ROS 2 systems. rqt_graph can help you find that out more easily. It displays a visual diagram of the nodes running in ROS 2 and their topic connections.
- Start
rqt_graph:
ros2 run rqt_graph rqt_graph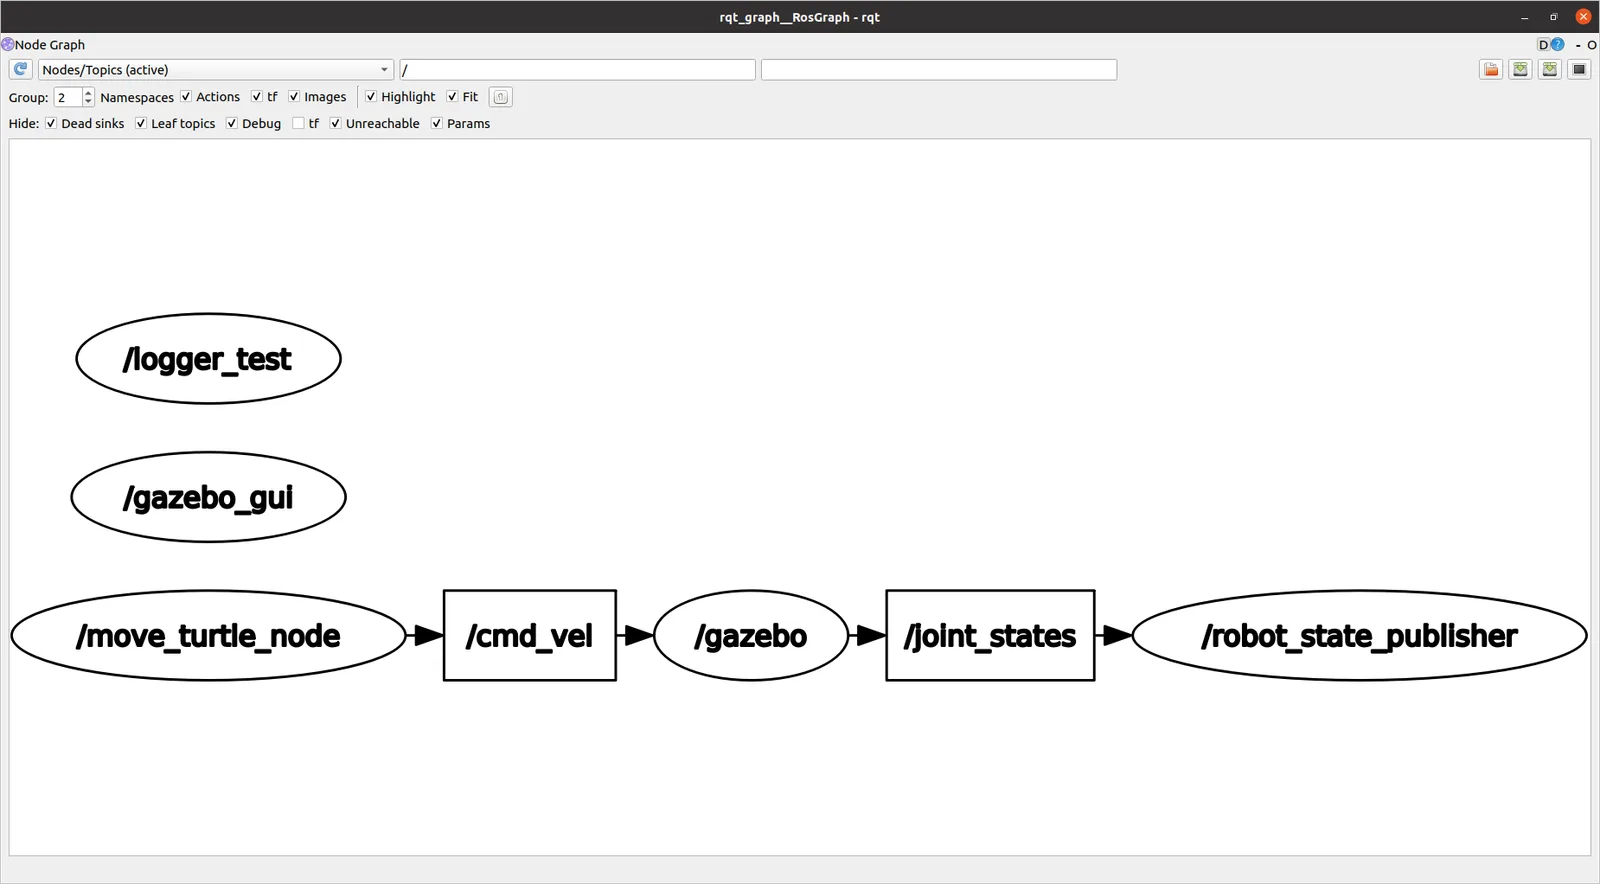
In the figure, you are presented with all of the currently running nodes, connected by the topics they use to communicate with each other (publish/subscribe). There are two main elements that you need to know how to use:
- The refresh button: Which you have to press any time you have changed the nodes that are running.
- The filtering options: These are the three boxes just beside the refresh button. The first element lets you select between only nodes or topics. The second box allows you to filter by names of nodes.
RViz2
And here you have it. The HollyMolly! The Firebolt broom, the Cloak of Invisibility! The most important tool for ROS 2 debugging....
RViz2RViz2 is a tool that allows you to visualize images, PointClouds, 2D lasers, kinematic transformations, RobotModels, IMU readings, RGBD PointClouds, etc. You can even define your own markers. This is one of the reasons why ROS has been so widely accepted. Before RViz, it was really difficult to know what the robot was perceiving. And that is the main concept:
RViz2 is NOT a simulation. I repeat: it is NOT a simulation.
RViz2 is a representation of what is published in the topics, by the simulation or the real robot.
RViz2 is a really complex tool and it would take you a whole course just to master it. Here, you will get a glimpse of what it can give you.
Example
Start RViz2 in a new terminal [ctrl + b] and [Shift + 5]:
ros2 run rviz2 rviz2or simply type:
rviz2Add stuff that should be displayed as visualized in the video.
As shown in the figure, we can save the just created display configuration to a specific file, so we can load it using a launch file or the command line with ros2 run rviz2 rviz2 -d <path-to-config.rviz>.
Homework [5 Points]
- Adapt the
move_turtlebot.launch.pyfile so that it starts RViz2 with the following topics visualized:- The Robot model
- All coordinate frames (TFs) of the robot without their names
- The 2D laser scan topic
- Create a Python file
unit2_hw.pythat subscribes to the robot's odometry and laser scan topic, performing the following:[odometry]: Log the odometry message to DEBUG[scan]: Publish the 5 closest points of each sensor reading asstd_msgs/Float32MultiArrayon the topicn_smallest
Hints:
- Load the RViz2 display-config by adding
arguments=['-d', rviz_config]to theNode(package='rviz2', ...)entry in your launch file. - Use
get_package_share_directory('first_pkg')+os.path.jointo get the path to your RViz2 config file. - Convert the variable that holds the ranges of the laser scan data to a numpy array to ease computation.
- For the
LaserScansubscription userclpy.qos.QoSPresetProfiles.SENSOR_DATA.value— sensor streams are best-effort.
std_msgs/Float32MultiArray can be declared as below:
from std_msgs.msg import Float32MultiArray
from numpy import asarray

# Option A
msg = Float32MultiArray(data=[20, 30, 4, 22, 16])

# Option B
array = asarray([20, 30, 4, 22, 16])
msg = Float32MultiArray(data=array.tolist())Ordinary Wizarding Level
7 questions · 5 pts first try · 2 pts on a later try · +15 bonus for a clean sweep
Question 1 of 7
In an ament_python package called first_pkg, where do your node files like points_publisher.py go?