2. ROS basics
Core ROS concepts - nodes, topics, services
Basic Concepts
Estimated time to completion: 1.5 hours
Simulated robot: Turtlebot 3 Burger
What will you learn with this unit?
- What is ROS?
- How to structure and launch ROS programs (packages and launch files)
- How to create basic ROS programs (Python based)
- Basic ROS concepts: Nodes, Parameter Server, Environment Variables, Roscore
- Debugging Tools: ROS Command Line Interface (CLI)
What is ROS?
ROS (Robot Operating System) is a set of software libraries and tools that help you build robot applications. It provides drivers, state-of-the-art algorithms, and powerful developer tools for your next robotics project. It's all open source.
Let's start with learning about ROS!
- First we need to start the simulation of our mobile robot in a world depicted in the img below.

For this we use an existing simulation provided by ROBOTIS. Execute the following commands in different terminals.
Start the simulation, in gazebo, and put the robot inside:
roslaunch turtlebot3_gazebo turtlebot3_world.launch model:=burgerOpen another vertikal terminal window in tmux by pressing [ctrl] + [b] and then [Shift + 5]. You now should have two terminal windows side by side.
Spawn the necessary coordinate transformations from the base of the robot to sensors/ actuators:
Paste the following command in the new terminal:
roslaunch turtlebot3_bringup turtlebot3_remote.launchHooray so easy is the start of a simulated robot with ROS and GAZEBO.
Let's continue by moving our robot. For this execute one of the following commands in a new terminal
Open another horizontal terminal window in tmux by pressing [ctrl] + [b] and then [Shift + 2]. You now should have two terminal windows side by side.
Move the robot:
Paste the following command in the new terminal:
roslaunch turtlebot3_teleop turtlebot3_teleop_key.launchNow you can move the robot using the keyboard with the [w,a,s,d,x,s] keys (turtlebot3_teleop command). But make
sure that the terminal window is active, otherwise the robot won't move!
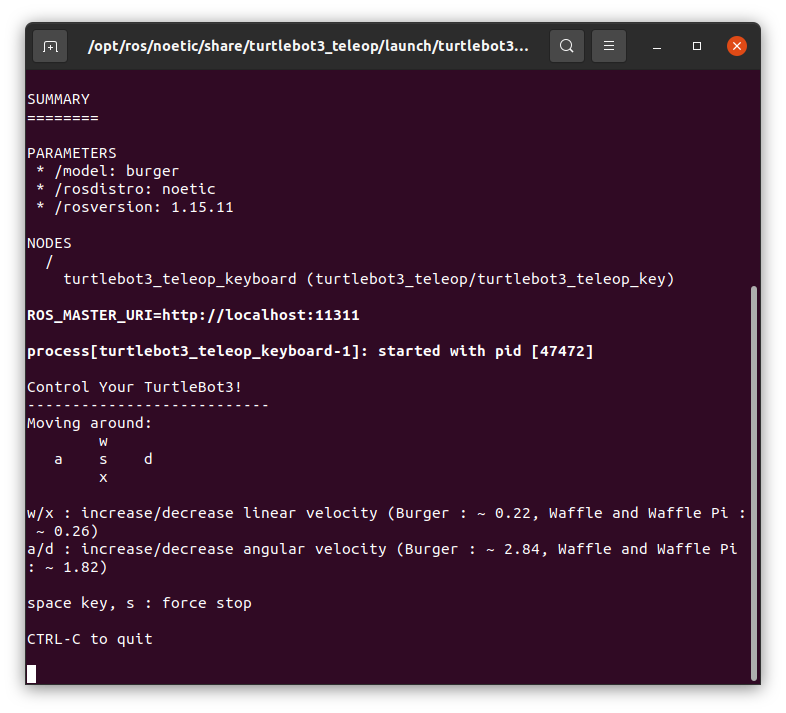
To exit the turtlebot3_teleop_key.launch press [ctrl] + [c] at the same time in the terminal where the command was executed.
You can also move the robot using the GUI (rqt_robot_steering) by executing the following command in a new terminal:
rosrun rqt_robot_steering rqt_robot_steering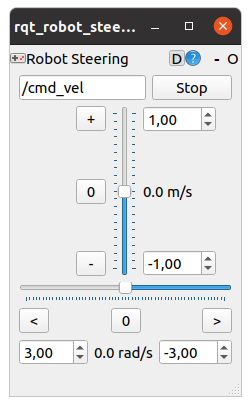
Try it now!!!
-
To stop any running (linux) commands press
[ctrl] + [c]at the same time in the desired terminal. -
To close any window press
[ctrl] + [d]at the same time in the desired terminal.
Explanation
Here we used two commands of the ROS CLI to start a number of executables (aka. nodes) (roslaunch) or just one node (rosrun). The basic syntax for the commands is as follows:
roslaunch [package_name] [launchfile_name]rosrun [package_name] [launchfile_name]What is a ROS package?
ROS uses catkin packages to organize all it's programs. You can think of a package (pkg) as all the files that a particular ROS program contains to perform its task (all cpp files, python files, configuration files, compilation files, startup files, and parameter files). All pkgs should follow this folder organization:
CMakeLists.txt: List of cmake rules for compilation, can also handle installationpackage.xml: Package information and dependencieslaunch/: Folder that contains launchfilessrc/: Folder that contains source code (c++, python)
To change the path to any ROS pkg use the roscd command of the ROS CLI.
roscd [package_name]Exercise [5 min]
Try to change the path to the previously used pkgs (turtlebot3_gazebo, turtlebot3_teleop, rqt_robot_steering) and list the contents (Hint: use ls to check the content). Can you find something strange?
Exercise Solution
roscd turtlebot3_gazebo && lscmake launch models package.xml rviz worldsSince the turtlebot3_gazebo, turtlebot3_teleop, and rqt_robotsteering are installed from source (using apt) you can't find the src folder since only the binaries are installed. You can find them in */opt/ros/noetic/lib/.
What is a launchfile?
So far we only know that launchfiles can be used to start an arbitrary number of executables (nodes). Let's have a look at how this is done.
Change directory to the launch folder inside the turtlebot3_teleop pkg and display its content:
roscd turtlebot3_teleop/launchcat turtlebot3_teleop_key.launchYou should see the following now:
<launch>
  <arg name="model" default="$(env TURTLEBOT3_MODEL)" doc="model type [burger, waffle, waffle_pi]"/>
  <param name="model" value="$(arg model)"/>

  <!-- turtlebot3_teleop_key already has its own built in velocity smoother -->
  <node pkg="turtlebot3_teleop" type="turtlebot3_teleop_key" name="turtlebot3_teleop_keyboard"  output="screen">
  </node>
</launch>
Launch files inherit the xml code structure. All launch files are contained within a tag. Inside that tag, you can see the tags, and for now, don't worry about the and tags. Let's focus on the tag for now, it is specified with the following parameters:
- pkg="package_name": Name of the package that contains the code of the ROS program to execute
- type="python_file_name.py: Name of the program file that we want to execute
- name="node_name: Name of the ROS node that will launch our executable file
- output="type_of_output": Through which channel you will print the output of the executable file
Create a ROS package
Until now we have checked the structure of already existing packages.... but now we want to create our first pkg together.
When we want to create packages, we need to work in a very specific ROS workspace known as the catkin workspace. The catkin workspace is the directory on your hard drive your ROS pkgs (other source code based pkgs/ not installed via apt) must reside in order to be used by ROS. Normally, the catkin workspace directory is called catkinws. and is located in /home/[user_name]/catkinws.
If your catkin_ws is not setup follow this tutorial and continue afterwards. Let's discuss the syntax for pkg creation now:
catkin_create_pkg [package_name] [package_dependecies]The package_name is the name of the package you want to create, and the package_dependencies are the names of other ROS packages that your package depends on.
Change the directory to source folder inside the catkin_ws
roscd && cd ../src/fhtwCreate a new ROS pkg
catkin_create_pkg first_pkg rospy roscpp std_msgs sensor_msgsWe also set dependencies to rospy, roscpp, std_msgs, and sensor_msgs. These are the most common dependencies for ROS pkgs. rospy is the Python client library for ROS, roscpp is the C++ client library for ROS, std_msgs contains common message types, and sensor_msgs contains message types for sensors.
Update the "look-up path" for ROS by sourcing the setup script of our workspace and rebuild the package index. source setup.bash: We source the setup.bash file to load pkgs inside the catkin_ws.
roscd && source setup.bashrospack profile: Useful if a newly create pkg can't be found by ROS. Crawls through all sourced catkin workspaces, and the default location of pkgs installed via apt to update the available package list.
rospack profileCheck if the pkg has been created successfully by utilizing the ROS CLI. rospack list: Gives you a list with all the packages in your ROS system. rospack list | grep my_package: Filters, from all the packages located in the ROS system, the package named my_package.
rospack list | grep first_pkgfirst_pkg /home/[user]/catkin_ws/src/fhtw/first_pkgroscd first_pkg: Takes you to the location in the Hard Drive of the package, named my_package.
roscd first_pkgYou can also see the package created and its contents by just opening it with the file explorer/ IDE of choice.
First ROS executable
Executables in ROS are called nodes, more on nodes later.
We just created our first ROS package, now let's put some code into it.
Create a src and launch folder inside our pkg
roscd first_pkg && mkdir -p src launchCreate a python file and make it executable
touch src/first_node.pychmod +x src/first_node.pyCreate a launchfile
touch launch/first_pkg_launchfile.launchOpen the first_node.py file with vim or VSCode:
Using Vim:
vim src/first_node.pyNow press i to enter insert mode and paste the code below. To save and exit press esc and type :wq for write and quit and press enter.
Using VSCode:
In VSCode you can simply click on the file and paste the code in the editor.
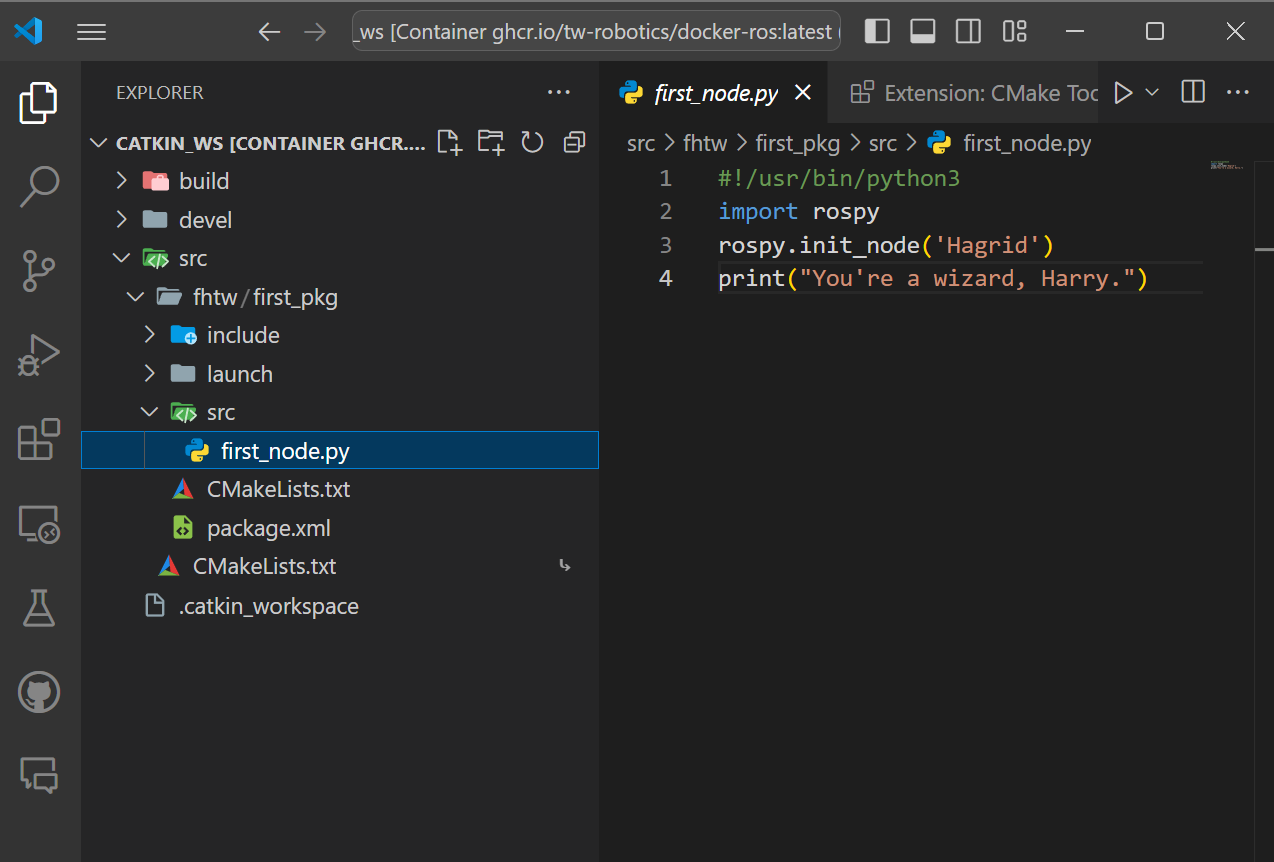
Put the following code in the first_node.py file:
#!/usr/bin/python3
import rospy
rospy.init_node('Hagrid')
print("You're a wizard, Harry.")
Exercise [5 min]
Try to copy and adapt the code from the previous turtlebot3_teleop_key.launch launchfile, that we inspected, to start the first_node.py script and start the launchfile.
Exercise Solution
Change to the first_pkg directory:
roscd first_pkgChange to to the launch folder we created earlier inside the first_pkg and open the first_pkg_launchfile.launch file with vim or VSCode:
Vim:
vim launch/first_pkg_launchfile.launchNow press i to enter insert mode and paste the following code:
<launch>
    <!-- Start our create node -->
    <node pkg="first_pkg" type="first_node.py" name="Hagrid"  output="screen"/>
</launch>
Press esc and type :wq for write and quit and press enter.
To start the launchfile simply type in a terminal:
roslaunch first_pkg first_pkg_launchfile.launchYou should see the following output:
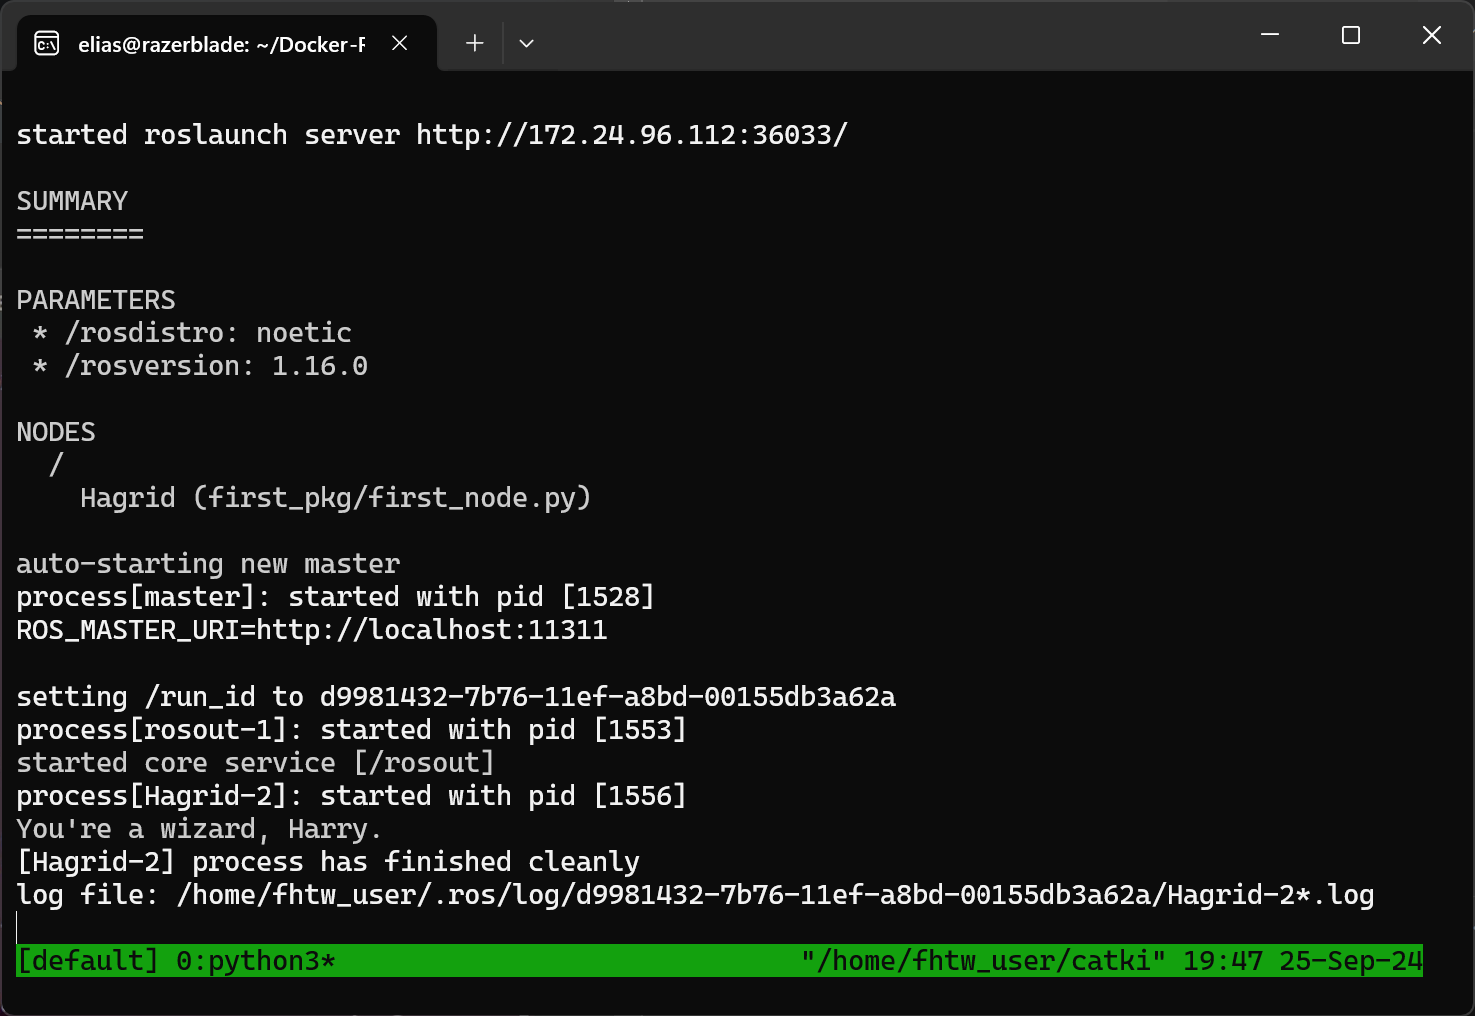
Code Explanation: first_node.py
#!/usr/bin/python3
# This line will ensure the python interpreter used for this node. Every Python file needs to start with this line at the top.
import rospy  # Import the rospy API from ROS
rospy.init_node('Hagrid')  # Initialize a node called Hagrid
print("You're a wizard, Harry.")  # Print this statement
You're a wizard, Harry.ROS Nodes
You have created a node previously in this tutorial, but what exactly is a node?
A ROS node is basically a process that performs computation. It is an executable program running inside your application. You will write many nodes and put them into packages.
Now let the launched node open and open a new terminal by pressing [ctrl + b] and [Shift + 5] to check if the node is running.
To see a list of running nodes execute the following command in the new terminal:
rosnode list I know you can't find it, that's simply because the node ended after printing our Harry Potter quote.
Here is how we fix that:
Stop the running node by pressing [ctrl + c] in the terminal where the launchfile was started.
Navigate to the first_pkg directory and open the first_node.py file:
roscd first_pkg && vim src/first_node.pyVim trick to delete all lines in a file:
- Press
ggto go to the first line of the file. - Press
dto enter delete mode: - Press [
shift + G] to delete all lines.
Press esc and type :set paste to paste the code below:
Make sure the indentation is correct, as Python is very sensitive to indentation. If necessary, correct the insterted code.
#!/usr/bin/python3
import rospy
if __name__ == '__main__':
    rospy.init_node("Hagrid")
    rate = rospy.Rate(10) # We create a Rate object of 10Hz
    while not rospy.is_shutdown(): # Endless loop until Ctrl + C
       print("You're a wizard, Harry")
       rate.sleep() # We sleep the needed time to maintain the Rate fixed above
    # This program creates an endless loop, while the roscore
    # (more about this later) is not shutdown, that repeats itself 10 times per
    # second (10Hz) until somebody presses Ctrl + C
    # in the Shell or kills the node using the ROS CLI (rosnode kill /Hagrid)
Save and exit the file by pressing esc and typing :wq and pressing enter.
Start the launchfile again to see the change
roslaunch first_pkg first_pkg_launchfile.launchCheck if you can find the node by typing in a new other terminal, created with [ctrl + b] and [Shift + 5]:
rosnode list 
Compile a ROS catkin package
When you create a package, you will usually need to compile it (especially c++ code/ custom msgs/ custom actions) in order to create the executable. There are different methods that can be used to compile your ROS packages. Neither python files nor launchfile need to be compiled, after changing the code. However, it is good practice doing so. For this course we will present you the 2 most common build tools for ROS catkin pacakges:
Navigate to the catkin_ws directory:
roscd && cd ..Compile the package using the catkin_make command (preinstalled with ROS):
catkin_makeor
catkin build # needs to be installed using pip or aptBoth commands will compile your whole src directory of your catkin_ws, and both need to be run in your catkin_ws directory in order to work. This is MANDATORY. If you try to compile from another directory, it won't work.
If you want to switch between these build tools you first need to remove the build and devel folder inside your catkin_ws.
To remove the build and devel folder execute the following command:
- Navigate to the catkin_ws directory:
roscd && cd ..- Remove the build and devel folder:
rm -rf build develrmis for remove-ris for recursive (which means it will remove all files and directories inside the build and devel folder)-fis for force (which means it will not ask you for confirmation)
Now you can switch between the build tools.
catkin build And the other way around:
- Remove the build and devel folder:
rm -rf build devel- Compile the package using the
catkin_makecommand:
catkin_makeROS Parameter Server
The ROS Parameter Server is more or less a look-up table that ROS uses to store parameters. These parameters can be used by nodes at runtime and are normally utilized for static data, such as configuration parameters. It is stored on the roscore/ rosmaster.
First start a roscore:
roscoreOpen a new terminal window with [ctrl + b]and [Shift + 5].
To get a list of all parameters execute
rosparam listTo get the value of a parameter execute
rosparam get [param_name]To set the value of a parameter execute:
rosparam set [param_name] [value]Exercise [5 min]
Now try to create a new parameter called Hermonie that contains the following value and check the value:
"Now, if you two don't mind, I'm going to bed before either of you come up with another clever idea to get us killed or worse… expelled!"
Tip
If you encounter the error ERROR: Unable to communicate with master!, execute roscore in a different terminal and try again.
Exercise Solution
rosparam set Hermonie "Now, if you two don't mind, I'm going to bed before either of you come up with another clever idea to get us killed or worse... expelled!"rosparam get /HermonieThe desired output should be:

ROSMASTER
The rosmaster acts as a name server for node-to-node connections and message communication. The roscore command is used to run the master, with the master running you can register the name of each node rospy.init() and retrieve information as needed. Node-to-node connections and message communications such as topics and services are not possible without the master.
The roscore command starts a collection of nodes and programs that are pre-requisites of a ROS-based system. Thus we must have a roscore running in order for ROS nodes to communicate.
The command that launches a roscore is:
roscoreIf you use roslaunch, it will automatically start roscore if it detects that it is not already running (unless the --wait argument is supplied).

Homework [5 Points]
- Create a launchfile named
simulation.launchin the launch directory of our first_pkg. - Include the launchfiles
turtlebot3_world.launch modelandturtlebot3_remote.launchof the packagesturtlebot3_gazeborespectivelyturtlebot3_bringup
Hint: Have a look at the ROS Wiki for the XML syntax, especially the include tag.